
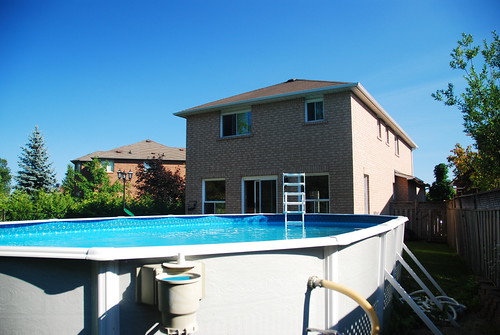
21 Jan How To Move an Above Ground Pool?
Summer is a time for outdoor fun, and nothing says summer like splashing around in a pool. If you’ve recently purchased an above ground pool, the next step is to get your yard ready for its big move. Here are some tips on how to prepare your yard for an above ground pool move so you can start enjoying it in no time.
Read: Best Robotic Pool Cleaners
Step #1: Clear Your Yard
The first thing you’ll want to do is clear your yard of any debris that could interfere with the installation of your new pool. This means removing any rocks, sticks, roots, or other items that may be obstructing the area where you plan on setting up your new pool. Be sure to also remove any furniture and landscaping if needed and make sure the area is free of any sharp objects that could puncture the liner of the pool.
Step #2: Level Out The Ground
You’ll need a flat surface to install your above ground pool on so make sure you level out any bumps or hills in the area where you plan on setting it up. You can use a shovel to level out larger areas or use sandbags or concrete blocks if there are smaller bumps or dips that need attention. Make sure the entire area is completely flat before proceeding with installation.
Step #3: Measure The Area
Accurately measure out where you plan on installing the above ground pool and mark it off with stakes or flags so there won’t be any confusion when it comes time for installation. Double check all measurements before moving forward and make adjustments as needed until everything looks right and fits perfectly within the marked-off space.
Step #4: Lay Down A Protective Barrier
Once you have everything measured out correctly, lay down some type of protective barrier underneath where your new above ground pool will be installed such as sandbags, gravel, plastic sheeting, etcetera. This barrier will help protect against dirt getting into your new pool while also providing extra cushioning against potential damage from heavy equipment used during installation such as jackhammers and drills. Additionally, this barrier will also help keep water from seeping into areas below where it shouldn’t go such as under decks or patios nearby.
Step #5: Prepare The Pool Site
Now that everything has been measured correctly and laid down properly it’s time to prepare the site itself for installation which includes laying down a tarp over dirt surfaces so they don’t get muddy when wet from all of that splashing around later on! Additionally, add some type of padding such as foam mats underneath where each leg of the above ground pool frame will be placed in order to provide extra support when securing them into place with screws. Finally, secure all sides together tightly using clamps so nothing shifts during installation which could cause issues later down the road..
Step #6: Ready To Go!
Once everything has been prepped correctly then congratulations –you’re ready for an above ground swimming pool move! Make sure all measurements are double-checked one last time before beginning setup then call in professionals if needed otherwise enjoy watching your backyard transform into an oasis! With these tips preparing your yard for an aboveground swimming move should now be easier than ever before thus allowing more time to relax by taking a dip afterward…
No Comments